How to use Chppr
A practical map for slicing audio, playing pads, sequencing loops, and exporting chopped samples in your browser.
- Add audio
- Slice a region
- Play pads
- Export WAV
Quick start
- Add audio. Drop a file, record audio, capture browser audio, or load the demo sample.
- Choose a source region. Find the drum break, vocal phrase, melody loop, or texture you want to test.
- Press Slice. The selected region becomes chops on the active track.
- Play the pads. Check whether the chops feel like an instrument before spending more time on the idea.
- Sequence or export. Build a loop in the sequencer, export WAV, save a project file, or publish a share link.
What sounds work well in Chppr?
Chppr is easiest to learn with sounds that have clear starts: drum breaks, melody loops, vocal phrases, one-shots, and texture recordings. Long songs can work, but a short loop or phrase is faster to judge.
Screen map
The easiest way to understand Chppr is to separate the app into three ideas: sources, tracks, and workflow panels.

Track A-D
Use tracks as separate working layers. A common setup is drums on A, vocal chops on B, melody on C, and a texture or alternate idea on D.
Slice / Pads / Sequencer
The workflow panels change after you create slices. If the pads or sequencer look empty, slice the active track first.
Tracks and sources
This is the mental model that prevents most first-use confusion.

- Source
- The original audio you add to Chppr. It can be an uploaded file, a recording, captured browser audio, or the demo sample.
- Track
- A working layer. Each track stores its own source selection, sliced region, pads, pattern, pitch, and playback settings.
- Track A-D
- Four layers for sketching a beat. You can keep one track simple, then use another track for a different source or a different chop idea.
- Sources view
- The source icon opens a list of loaded sources. It is useful when you want to add, preview, remove, or check which tracks use a source.
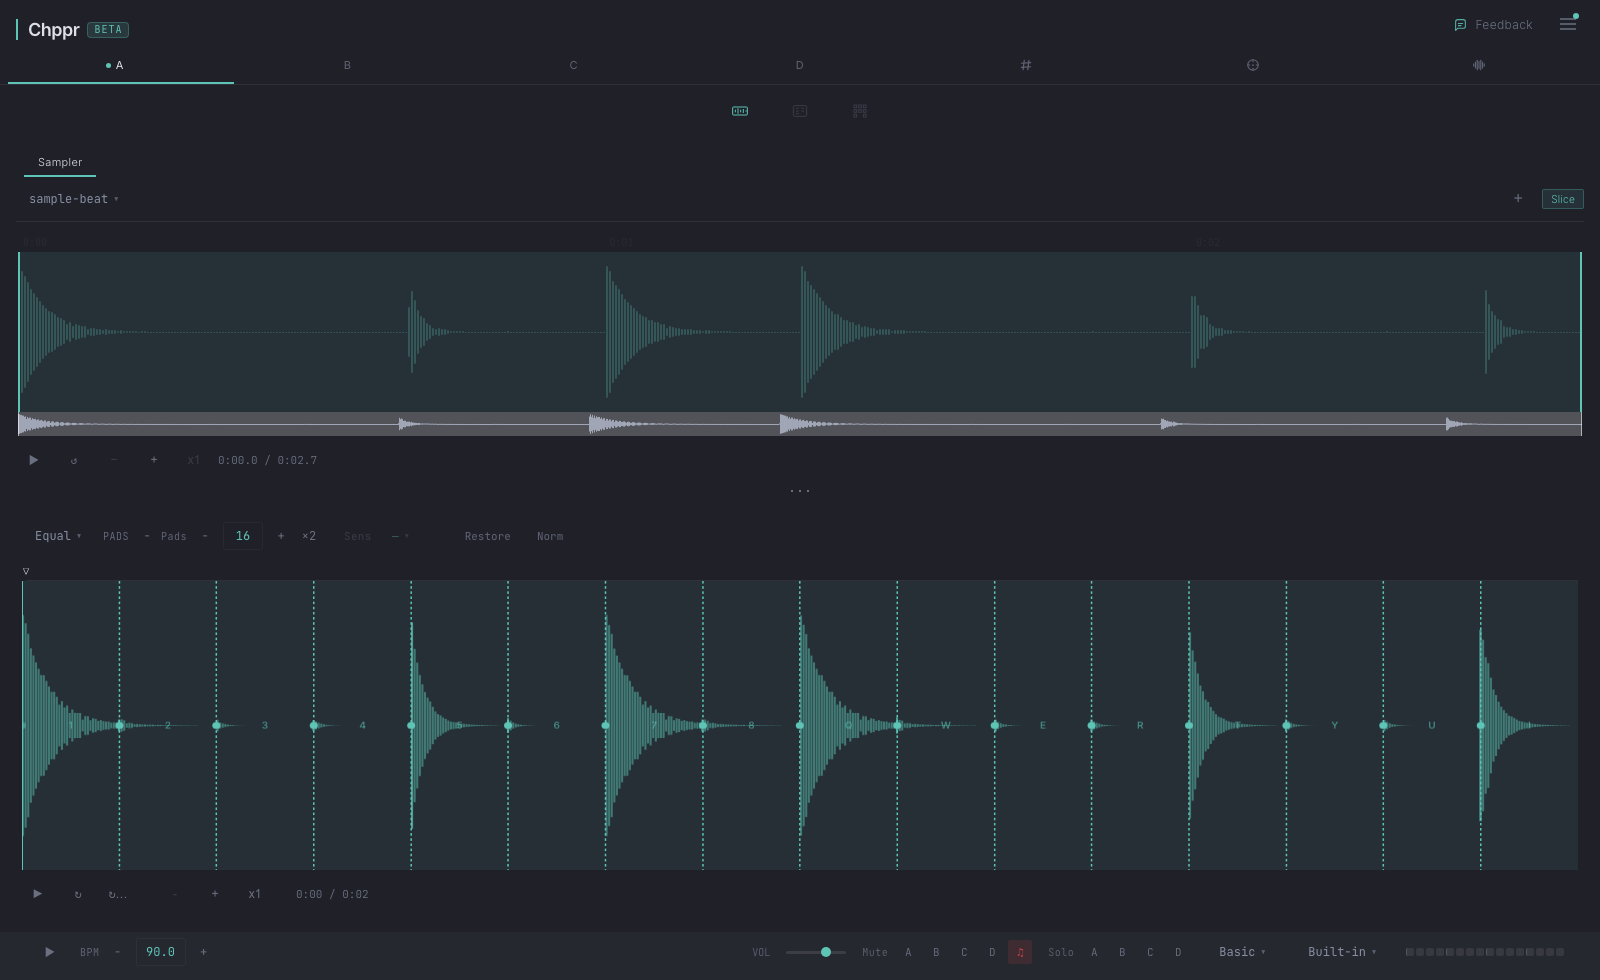
Slice, pads, and sequencer
These three areas are one workflow, not separate features. Slice first, play the result, then arrange a pattern if the chops are working.

How to slice
- Pick the active track at the top of the app.
- Choose a source from the source selector.
- Select the useful region on the waveform.
- Press Slice to assign the region to the active track.
- Adjust slice points, add or remove cuts, normalize if needed, and reslice when the feel changes.
How to play pads
After slicing, open the pads panel. Each pad triggers a slice from the active track. This is where you check whether the sample feels good under your fingers before sequencing it.
How to sequence
Open the sequencer panel after a track has slices. Add steps to trigger pads over time. Use this to sketch a loop, then export patterns if the sequence itself is worth keeping.
Using multiple tracks
Tracks do not have to mean finished song stems. They are lightweight scratch layers. You can use them for different roles while you test an idea.
- Track A: drum break or main groove.
- Track B: vocal chop or short hook.
- Track C: melody loop, texture, or field recording.
- Track D: alternate chop, extra percussion, or a quick comparison idea.
If a track has no slices, the pads and sequencer for that track will be empty. Switch back to the slice panel and create slices for that active track.
Save, export, and share
Chppr has several outputs because different moments need different files.

- Save project
- Downloads a Chppr project file so you can reopen the session later. This is local and does not require an account.
- Export slices
- Downloads the chopped pad sounds as WAV files. Use this when you want to bring one-shots into Ableton, FL Studio, Logic, or another DAW.
- Export patterns
- Downloads sequenced loops as WAV files. Use this when the pattern is the part you want to keep.
- Share project
- Creates a browser-playable link by packaging the project and saving it to cloud storage. Only publish audio you have the right to distribute.
Local audio is processed in your browser while you work. Audio is packaged and uploaded only when you publish a share link. Some remote sources cannot be bundled yet; if sharing fails, try an uploaded file or the demo sample.
BeatArc, Key Sync, and Sources
After the basic slice-to-pad flow makes sense, these views help you shape or manage the idea.
BeatArc
BeatArc appears after you have sliced material. It gives another way to play and explore the relationship between tracks.
Key Sync
Key Sync helps analyze and align the pitch relationship between tracks when you want chopped audio to sit together more musically.
Sources
Use Sources when you want to manage the original audio slots, add another source, preview a source, or remove material from the project.
Menu
The menu is where you save, load, export slices, export patterns, share a project, send feedback, and open this guide again.
Mobile guide
Chppr works best when you treat mobile as a quick sketch surface. Add audio, slice a small region, swipe through the lower panels, and use pads or the sequencer to test the idea.
For a focused phone and tablet overview, read the mobile sample chopper for phone and tablet page.
- Use shorter regions first. Long files are harder to manage on a small screen.
- If you cannot see pads or the sequencer, make sure the active track has slices.
- Use Save project before leaving if you want to keep editing later.
- If you need detailed arrangement, export WAV and finish the idea in a DAW.
Troubleshooting
I opened Chppr. What should I do first?
Add audio first. Drop a file, record audio, capture browser audio, or load the demo sample. Then choose a region and press Slice.
Where are the pads and sequencer?
They appear in the lower workflow panels after slicing. The first panel edits slices, the second plays pads, and the third opens the sequencer.
What is the difference between a source and a track?
A source is original audio. A track is the layer where you slice that audio, play pads, sequence a loop, and export results.
Why is export empty or unavailable?
Export needs material. Slice audio before exporting slices, and add sequencer steps before exporting patterns.
Do I need an account?
No account is needed to start, save a local project file, or export WAV. Creating a public share link publishes a project package to cloud storage.
Are my audio files uploaded?
Local files are processed in your browser while you work. Audio is packaged and uploaded only when you publish a share link.
Why did sharing fail?
Sharing can fail if a project uses audio that cannot be bundled into the cloud package. Try an uploaded file or the demo sample, and only publish audio you have the right to distribute.
Which export should I use?
Use Export slices for individual WAV chops. Use Export patterns for sequenced WAV loops.
Start with the sample project, then come back to this guide if anything feels hidden.
Try with demo sampleOpen Chppr